Share article:
Writing a Serverless Slack Bot

This week we have a guest post from Rick Measham, as Software Development Manager and Technology Team Leader at MessageMedia.
Introduction
Twenty years ago, I wrote my first automated chatbot. It hosted a trivia channel on IRC — the massive public chat network popular through the 90s and early 2000s. It asked a question, assessed answers and kept scores. It was written in AppleScript and required that I kept my Macintosh Quadra running 24/7, hoping the dial-up internet never flaked out. For some reason, writing bots for chat programs has become somewhat of a hobby. For many years my language of choice was Perl. I ran the bot on leased servers — expensive and overpowered for the simple nature of a bot.
In two tutorials, I’m going to bring you into my world. We’re going to work together to create a modern bot that you can interact with via Slack — the ubiquitous chat service of the modern technology company.
But we’re going to mix in some magic I would have loved twenty years ago. The magic of serverless architecture. You’ll be able to run your bot full time, in the cloud, without needing to run a server or provision any compute resources in your cloud environment.
These two tutorials will use Amazon’s AWS resources. But the concepts are easily transferred to Microsoft Azure, Google Compute or any other serverless environment you choose. The code I’ll show you will be written in Python, but it’s all simple enough that you could translate it into Node, Java, Go, or whatever language your environment provides.
In the first tutorial, we’ll explore how to set up a bot in AWS Lambda, linking in AWS API Gateways, and then attaching it to Slack. The actual bot is less important. All it will do is respond to a single command. There’s no state to maintain, no storage, no databases. By the time you’re finished, you should be able to repurpose the bot to respond with more useful information than this tutorial.
In the second tutorial we will link in some more of Amazon’s vast library of serverless services and a MessageMedia account to create a bot that can send and receive two-way SMS messages from within Slack.
Neither tutorial requires you to know how to write Python. All the code is provided, and you can just copy and paste. I’ll walk you through creating a serverless Slack bot. You can get the source from BitBucket here: https://bitbucket.org/RickMeasham/serverlessslackbot
Tutorial 1: Good one dad!
Let’s get this over with; I’m a dad. I tell dad jokes. But I’ve been telling them far longer than I’ve been a dad. Most of my friends laugh good-naturedly, but I’ll never forget the time my friend Suze responded to a joke with a sarcasm-laded “Good one dad”. (I’m sure she actually thinks I’m hilarious).
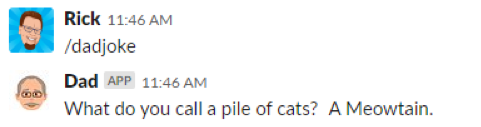
Let’s write a bot that Suze would love. Let’s write a bot that responds with a dad joke whenever someone types “/dadjoke” in our Slack account.
The Toolkit
This bot is super simple. All we need is an AWS account and a Slack account that will let us add an app. If your work account doesn’t let you add an app, then it’s free to sign up for your own Slack account. It’ll just be lonely unless you invite some friends. Similarly, you can sign up for a free AWS account with Amazon: https://aws.amazon.com.
In AWS we will use the Lambda service. Lambda is a serverless environment that runs a program on demand without requiring provisioning of compute (EC2) resources. If nobody ever says “/dadjoke” then the program will never execute, no compute resources will be used, and it will cost you nothing. At the time of writing you can create this Lambda and run it all within Amazon’s free tier. We’ll also use an API Gateway service, and log to CloudWatch. But we’ll let Lambda configure those for us. Lambda even comes with its own code editor, so we will literally be doing everything in the cloud.
It would be nice if you could connect Lambda to a Git repository for simple version management, but for now the best you can do is link Lambda to S3 and deploy your script to a bucket in a build pipeline. All that is well beyond our simple needs, so we will use the code editor provided by AWS in your browser.
Outline:
- Create a new “Hello World” Lambda
- Connect an API endpoint
- Create a Slack app
- Test the “Hello World” Bot
- Implement the Dad Jokes
- Security enhancement
- Delayed response hacking
- Extra credit challenges
During this tutorial, you will use two interfaces. One in Slack and the other in AWS. I recommend leaving them both open in two different browser tabs or windows to make it easy to jump back and forward
Step One: Create a New “Hello World” Lambda
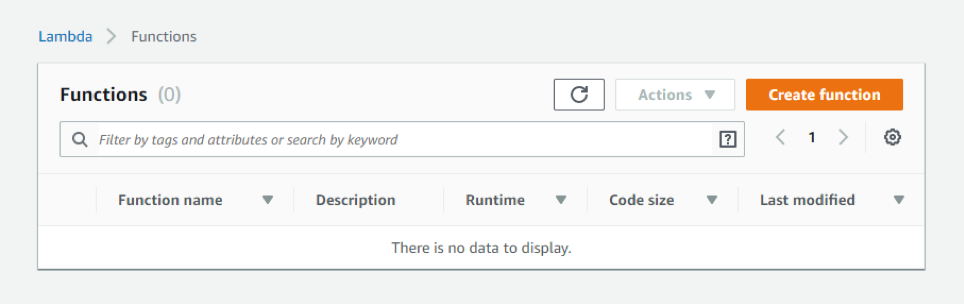
Open your AWS Console and navigate to Lambda. Click the Create Function button to create a new function.
We will “Author from scratch”, but Lambda has a number of blueprints available that include sample code and presets for a wide range of common use cases, and a repository of Lambdas you can instantly deploy without any customisation.
After you select “Author from scratch”, give your function a name. This name is up to you and is only used to help you find the function again in the future. You can call it anything you want. I’m calling mine “SlackDadJoke”.
Select Python 3.6 or higher as the Runtime, but don’t worry about the Permission section. Lambda will automatically create the execution role you need (though if you know what you’re doing, feel free to choose or create your own).
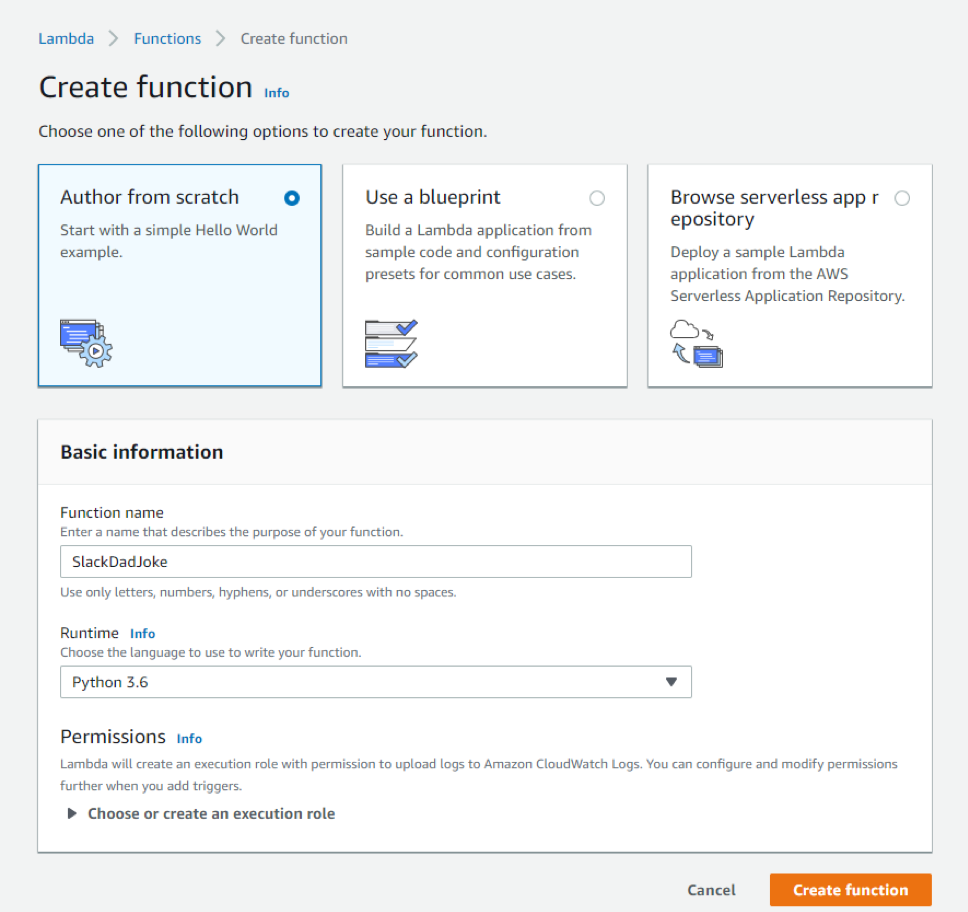
Click the “Create Function” button and wait a few seconds as Lambda provisions the resources you’ll need. After about 10 seconds you should get a congratulatory message and the Function will be open for editing.
Scroll down to the code editor and paste in the following code:
import json

def lambda_handler(event, context):

    return {

        'statusCode': 200,

        'body': json.dumps({

            'text': 'Hello World!'

        })

    }
This simple handler instantly returns a success status (200) and a JSON body that has just one attribute which is the text response “Hello World!”.
Slack will accept plain text here, so we could just return the string “Hello World!” rather than the JSON. Returning JSON lets us get quite complex in our response, so for extra credit read the documentation on the response and have a play with things like formatting and attachments.
Click the button at the top of the page to save your work.
Step Two: Connect an API Endpoint
For now, the only way to invoke our Lambda is to use the inbuilt test functionality. We won’t be covering that in this tutorial so we’ll connect an API endpoint. Then we can trigger the Lambda from a browser.
Above the code editor, you’ll have seen the Designer. This section lets us attach other services like an API endpoint. Open the Designer and click on “API Gateway” in the left column. This will instantly attach an API Gateway to our Lambda.
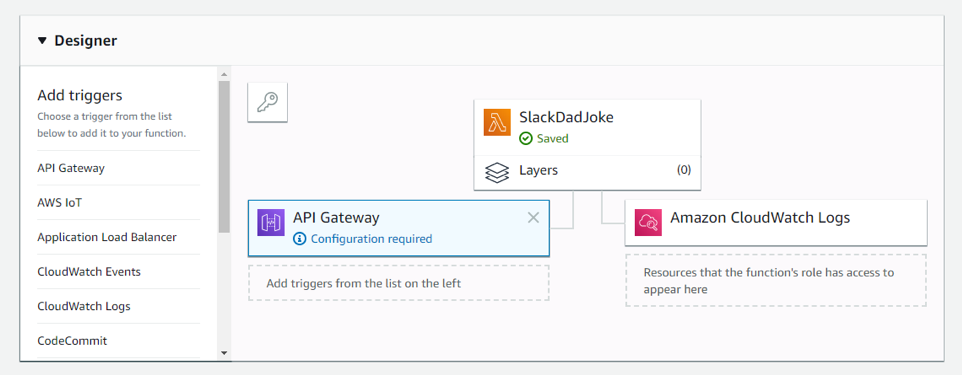
An API Gateway needs configuring so a new panel will have appeared directly below the Designer. Scroll down and set the Security to Open. This makes the API publicly available which means anyone with the URL can invoke our Lambda. For now, this is OK. In Step Six we’ll implement tight security. Click the Add button to finish configuring the API Gateway.
Make sure you now save your function again using the Save button at the top of the interface. This will update the API Gateway configuration panel and will give you a URL.
Open this URL in a new browser tab and, if everything is working you will get the “Hello World!” JSON payload. If you don’t get the expected result, go back to the start and review each step.
Step Three: Create a Slack App
Let’s attach our brand-new Lambda to Slack. We do this by creating a new “app” in Slack and configuring it to call the API Gateway we created above.
Remember, if you don’t have permission to add new apps to your company Slack account, it’s free to create a new Slack account and invite your friends.
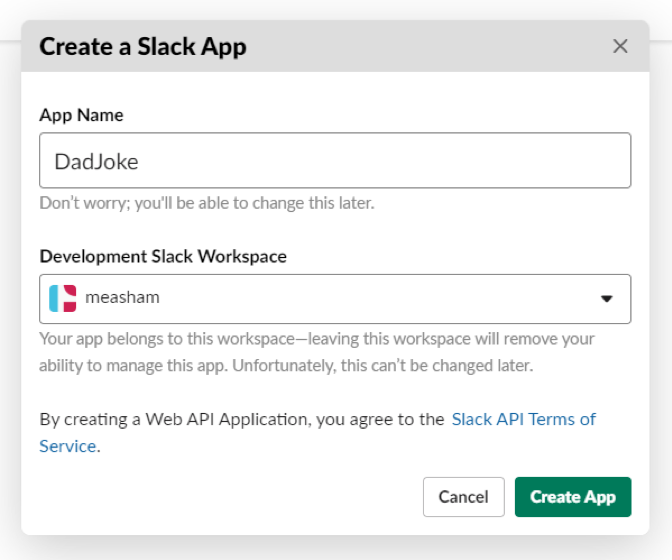
Create a new Slack app by going to https://api.slack.com/apps/new. Slack will ask you for just two things: a name for your app and the Workspace (account) to install the app into. I’ve called mine “DadJoke” and have installed it in my personal workspace.
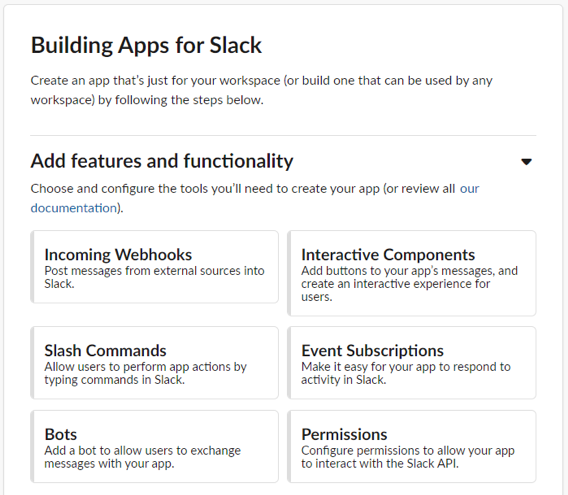
Slack will ask you what features and functionality to add. We are creating a Slash Command so go ahead and click on that button. On the following screen, you’ll be asked if you’re creating a new command or using an existing one. Create a new command.
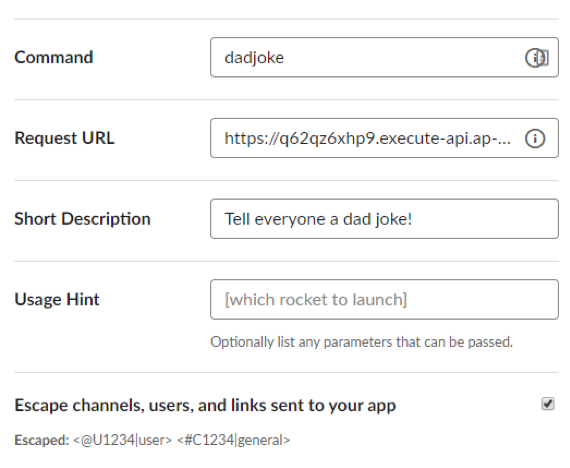
The next screen lets us configure the entire slash command by asking just five questions. Set the command you want people to use. I’ve used “dadjoke” so that when people type “/dadjoke” they’ll get a joke.
In the Request URL, paste the API Gateway URL from AWS. It will look something like this:
https://randomcode.execute-api.ap-southeast-2.amazonaws.com/default/SlackDadJoke
Enter a short description so everyone knows what the command does. E.g. “Tell everyone a dad joke!”, and turn on the “Escape channels, users and links” checkbox. We don’t need this right now, but you will need it if you want to complete the extra credit challenge in Step Seven.
Click the Save button and you should get a success message from Slack. If you don’t, go back to the start of this step and double check your work.
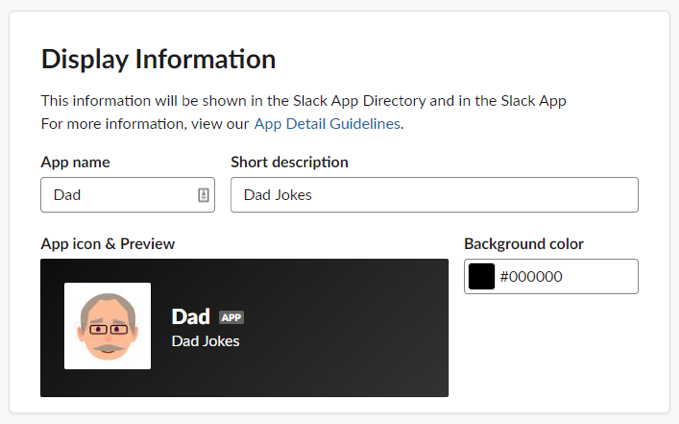
We will now customise our bot. In the left-hand navigation click “Basic Information”. Scroll down to the “Signing Secret” and use the Show button, then copy the secret somewhere. We will need it for security in Step Six. Further down you will see the “Display Information”. Set the app name to something like “Dad”, set a description, pick a background color and upload an icon (Slack can be a bit picky about this icon, so follow the on-screen prompts)
Step Four: Test the “Hello World” Bot
You would expect that by selecting your workspace in Step Three, the command would be instantly available. But it isn’t. We need to install it.
You’ll see “Install app” in the left-hand navigation in the Slack UI. After clicking the navigation you’ll be able to click a button to “Install app to Workspace”. Go ahead and click it, then Authorize the installation on the subsequent screen.
If you accidentally closed the browser, you can find your app by going to “Your Apps” or clicking here: https://api.slack.com/apps
Your app is now installed in your Slack workspace. Slack will be showing you an OAuth token. Ignore this as our app doesn’t need to connect to Slack via oAuth.
Jump into your workspace, find a quiet corner and type “/dadjoke”. As you type, Slack will show you autocomplete and tell you what the command does from where we set it up in Step Three.
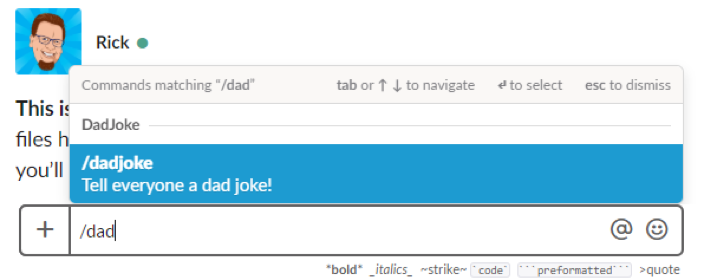
Finish the command, hit enter, and your Lambda should execute. You’ll see the Hello World message appear in Slack. This is what Slack calls an “Ephemeral” message. Only you can see it.

Congratulations! You now have a complete and working Serverless Slack Bot. But where are the jokes? And how do we make sure everyone else can enjoy the LOLs? Nobody needs a bot that just says “Hello World” right?
Step Five: Implement the Dad Jokes
Would you be surprised to know that someone has created an open API for dad jokes? Probably not. In fact, they’ve also built a Slack app. But using that would be cheating. They even have an endpoint especially for Slack, but again: cheating.
If you make a GET request to their endpoint, with an Accept header that says you want plain text (text/plain), you’ll get back a random dad joke. Try it from Postman or any other REST client: https://icanhazdadjoke.com/ (If you use your browser, it will give you back HTML as you can’t set the ‘Accept’ header. The API will also respond to requests for JSON).
We’ll use the Python “request” library to make this call. AWS provides the requests library and others via the botocore.vendored package.
This code updates the Lambda handler to return the joke to Slack and make it visible to everyone in the channel:
import json
from botocore.vendored import requests

def lambda_handler(event, context):

    joke = get_joke()

    return {
        'statusCode': 200,
        'body': json.dumps({
            'text': joke,
            'response_type': 'in_channel'
        })
    }

def get_joke():

    url = 'https://icanhazdadjoke.com/'
    headers = {
        'Accept': 'text/plain'
    }
    result = requests.get(url, headers=headers)

    if result.status_code == 200:
        return result.text

    return None
Paste the above code into the Lambda editor (remove the old code first) and hit the Save button. There’s no need to update anything else as the API Gateway still links to this Lambda, and the Slack app still calls the API endpoint.
Now in Slack you should be able to type “/dadjoke” and get a joke on demand.
Step Six: Security Enhancement
Of course, your API is still open to the world. We need to get some security implemented. Slack has this sorted, so we just need to implement their request verification. In Step Three you will have copied your Signing Secret somewhere. We will put this in an environment variable in the Lambda interface and refer to it from our code.
Scroll down below the code editor and find the Environment Variables section. Create a new key called ‘SIGNING_SECRET’ and paste the copied value.
If you forgot to keep your Signing Secret, you can go back to the Basic Information panel in your Slack app interface and get it again.

Using the request headers, the request body and this Signing Secret we can confirm that the request came from Slack. Details on the process are here: https://api.slack.com/docs/verifying-requests-from-slack. An implementation of this verification process is below and is also included in the final code at the end of this tutorial.
def verify_request(event):

    # Refer to this document for information on verifying requests:
    # https://api.slack.com/docs/verifying-requests-from-slack

    signature = event['headers']['X-Slack-Signature']
    req = 'v0:' + event['headers']['X-Slack-Request-Timestamp'] + ':' + event['body']
    request_hash = 'v0=' + hmac.new(
        os.environ["SIGNING_SECRET"].encode(),
        req.encode(), hashlib.sha256
    ).hexdigest()

    return hmac.compare_digest(request_hash, signature)
Step Seven: Delayed Response Hacking
Finally, you’ll notice that whenever you trigger a joke in Slack, your slash command is visible to everyone in the channel. This is a ‘feature’ of Slack, but there’s a way to avoid it. Rather than responding immediately with the joke, we can post it to Slack as a delayed response (even if the delay is microseconds).
This delayed response can be very useful. You have up to 30 minutes to send the delayed response, so this would give you time to execute several long-running processes – and even include some time-limited human interaction. We’ll just use it to avoid showing the slash command in the channel.
The payload from Slack includes a parameter called “response_url”. We can POST to this URL up to five times, so long as we are within the 30-minute period. The body of the POST should be the same JSON we were using in our Lambda return.
When we use the delayed response, we still need to respond immediately with a 200 OK – just with no content. If we don’t do that, Slack will tell the user that their command failed – even if we’re intending to send a delayed response.
You might be thinking to yourself, “how can we send a delayed response after we return from the Lambda function?”. Luckily, Slack isn’t fussy so we will send our delayed response before we send the immediate success message. Other options include using AWS Step Functions and a second Lambda. But that’s overkill for our purposes.
    # Send the joke to the channel as a delayed message
    request = urllib.parse.parse_qs(event['body'])
    url = request['response_url'][0]
    response = {
        'text': joke,
        'response_type': 'in_channel'
    }
    result = requests.post(url, json=response)
Wrapping everything up, here’s the final code. Paste this into your Lambda, hit the Save button and type “/dadjoke” in your Slack account.
import json
import os
import hmac
import hashlib
import urllib.parse
from botocore.vendored import requests

def lambda_handler(event, context):

    # Make sure this request has come from Slack
    if not verify_request(event):

        # If you're having problems, uncomment this line and check the cloudwatch logs:
        # print(json.dumps(event))
        return {
            'statusCode': 401
        }

    # Get a joke from icanhazdadjoke.com
    joke = get_joke()

    if not joke:
        return {
            'statusCode': 200,
            'body': json.dumps({
                'text': 'No jokes are available at this time',
                'response_type': 'ephemeral'  # Only tell the requester
            })
        }

    # Send the joke to the channel as a delayed message
    request = urllib.parse.parse_qs(event['body'])
    url = request['response_url'][0]
    response = {
        'text': joke,
        'response_type': 'in_channel'
    }
    result = requests.post(url, json=response)
    # If the delayed response was successful then we'll send an empty success message to Slack

    if result.status_code == 200:
        return {
            'statusCode': 200,
        }

    # If the delayed response failed for any reason, we'll send the joke in the API response
    return {
        'statusCode': 200,
        'body': json.dumps({
            'text': joke,
            'response_type': 'in_channel'
        })
    }

def get_joke():
    url = 'https://icanhazdadjoke.com/'
    headers = {
        'Accept': 'text/plain'
    }
    result = requests.get(url, headers=headers)
    if result.status_code == 200:
        return result.text
    return None

def verify_request(event):
    # Refer to this document for information on verifying requests:
    # https://api.slack.com/docs/verifying-requests-from-slack

    signature = event['headers']['X-Slack-Signature']
    req = 'v0:' + event['headers']['X-Slack-Request-Timestamp'] + ':' + event['body']
    request_hash = 'v0=' + hmac.new(
        os.environ["SIGNING_SECRET"].encode(),
        req.encode(), hashlib.sha256
    ).hexdigest()

    return hmac.compare_digest(request_hash, signature)
Step Eight: Extra Credit Challenges
If you want some extra credit, here are some challenges:
- When someone types “/dadjoke @username” have your bot mention the username in the response so it’s properly highlighted and they get an alert:
“Hey @username, what do you call a pile of cats? A meowtain.” - Use a serverless data store to remember the jokes already told. If you get back a duplicate, request another until you get a new joke.
- Use what you’ve learned to implement another data source – like your local weather.
About the Author

Rick Measham has been telling dad jokes for over 11 years. When he’s at work he runs MessageMedia’s Web Portal and brands teams with the philosophy of “hire good people and get out of their way”. In his spare time, he’s a part of the team that run events like The Art of Bulls**t and Mixup Melbourne/Mixup Sydney.