Share article:
How to send an SMS using Google Home

I recently purchased a Google Home Mini. Naturally working at MessageMedia one of my first requests to Google was “OK Google!!! Send an SMS” to which I was a bit disappointed, however it presented an opportunity. Over the next few days, I wanted to see if I could build a simple Google Home Action (Google Home app) that could send an SMS using the MessageMedia API (https://developers.messagemedia.com/code/api-documentation/). I was quite surprised how easy the whole process was except for the not so intuitive UI flow of Dialogflow, which is the online dev tool.
I’ll run you through some high-level steps I had to go through and the nodejs code I used is on GitHub. Note – I am not a nodejs developer so please feel free to take the code and work your magic.
Prerequisites:
1. A Google account. If you have Gmail you have a Google account.
2. A MessageMedia account username and password. If you go to https://messagemedia.com.au/ and click on the “Try It Free” link you will receive credentials that will allow you to send 5 free SMS. If you call up you can get the trial limit extended.
3. Unfortunately for the Google Action to use Firebase Google Cloud functions and send requests to a 3rd party API like MessageMedia you need to pay. Firebase is Google’s equivalent of AWS Lambda. There are 2 pricing plans: 1)USD $25 a month per project or 2) Pay as You Go plan. I will show you how to do this because it was not quite as clear.
4. Helps if you have a Google device like a Google Home or Google Home Mini but it is not necessary. You have to be signed into the device with the same Google Account you will be developing with. Dialogflow, which is a online dev tool I use has a handy Google Assistant test tool. You can type in the conversation or if you have a microphone you can speak with the test tool.
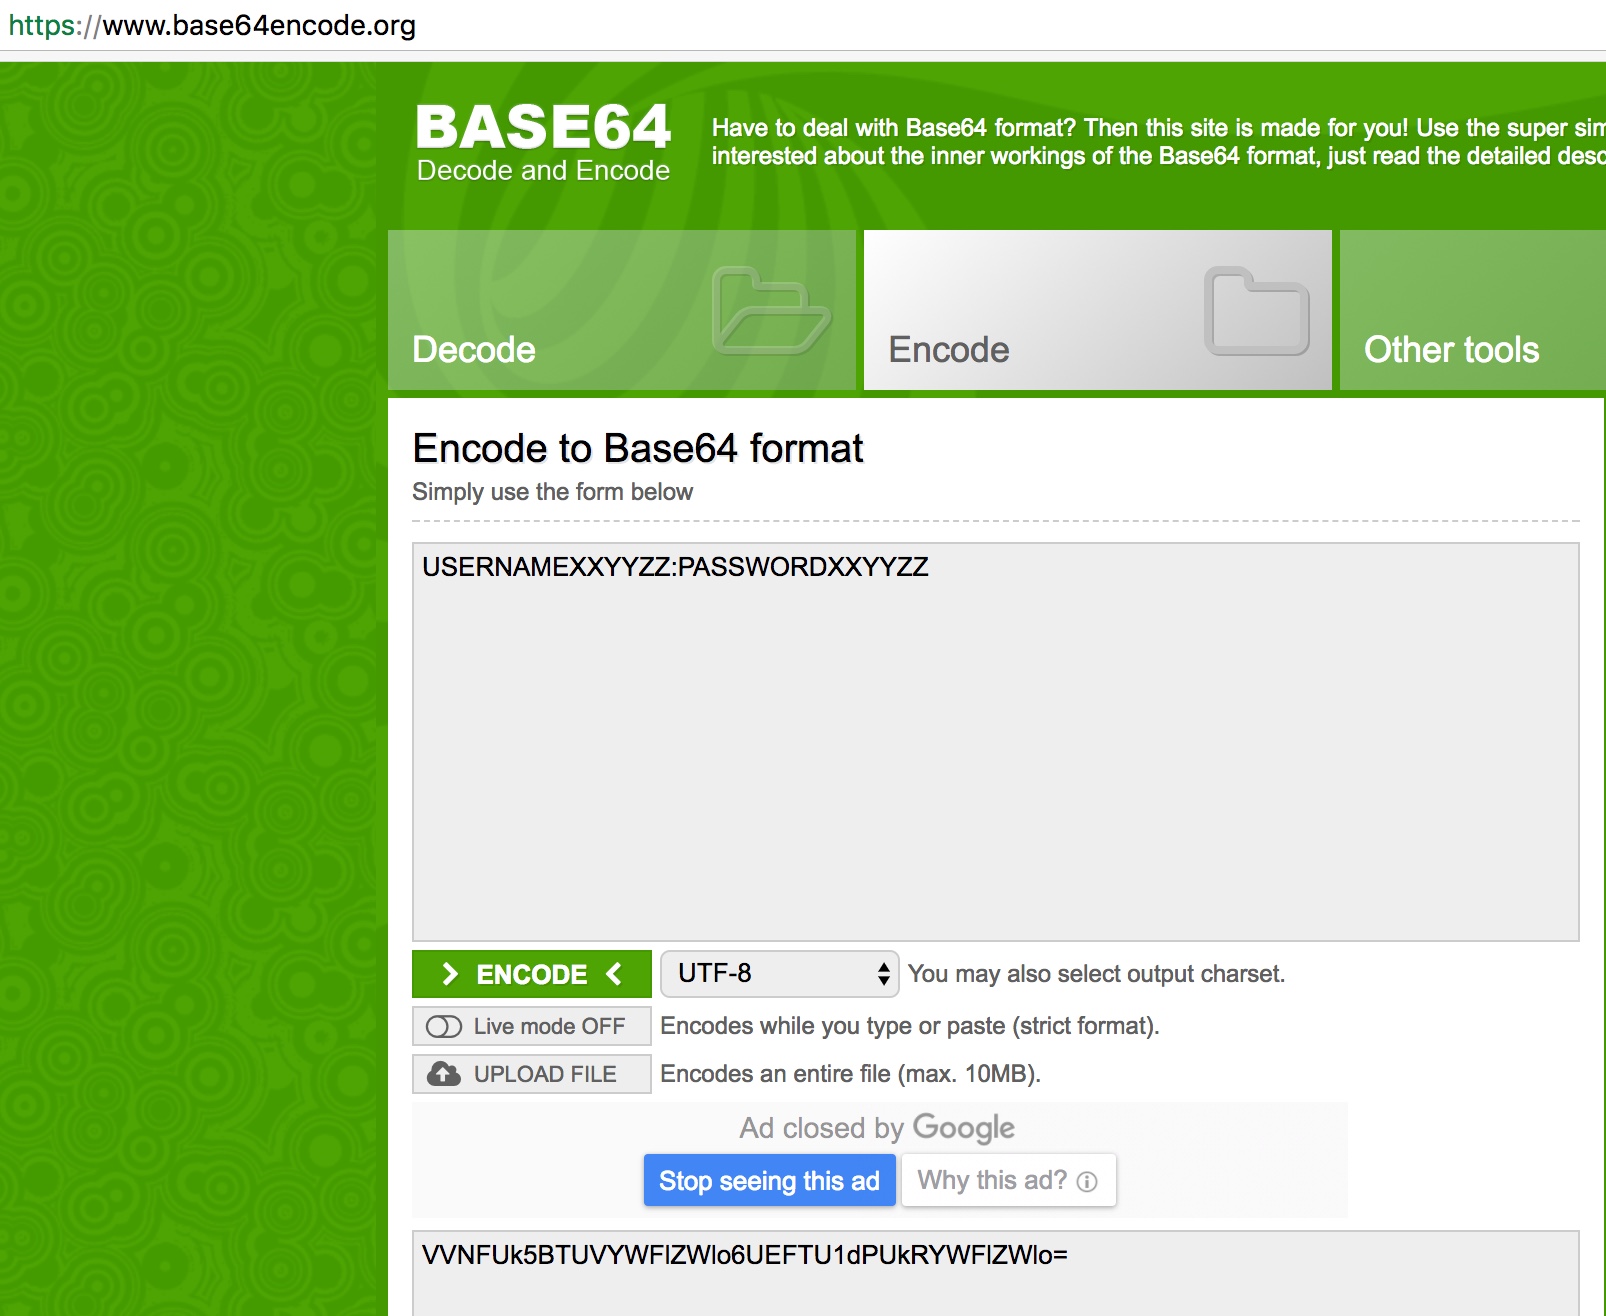
STEP 1: Base 64 encode username and password
For security and authentication purposes you will need to base 64 encode the username and password so it can be used in the code in STEP 3. To do this go to a page like https://www.base64decode.org/ and you will be able to encode the username and password separated by a colon. You will need the encoded value in STEP 3.
STEP 2: Create an Action on Google Project
I created the Google Action on the Google Dialogflow (previously known as API.AI) online console. This is an easy to use web console that allows you to create human interactions with Google devices. It also has a build in NLU (Natural Language Understanding), which makes a developer’s life a whole lot easier.
The following link is a get started article that I read beforehand and highly recommend – https://developers.google.com/actions/dialogflow/first-app
Navigate to https://console.actions.google.com/. To create a project, click the “Add/Import Project” button. Give it a name, something like “MM-SMS”. Once the project is created you may need to click on the “Add Actions ” button. This will give you a few different options to create your custom app. Select the “Build” link under Dialogflow. Then click on “Create Action on Dialogflow”. Give the Action a name like “MM-SMS” and click “Create”.
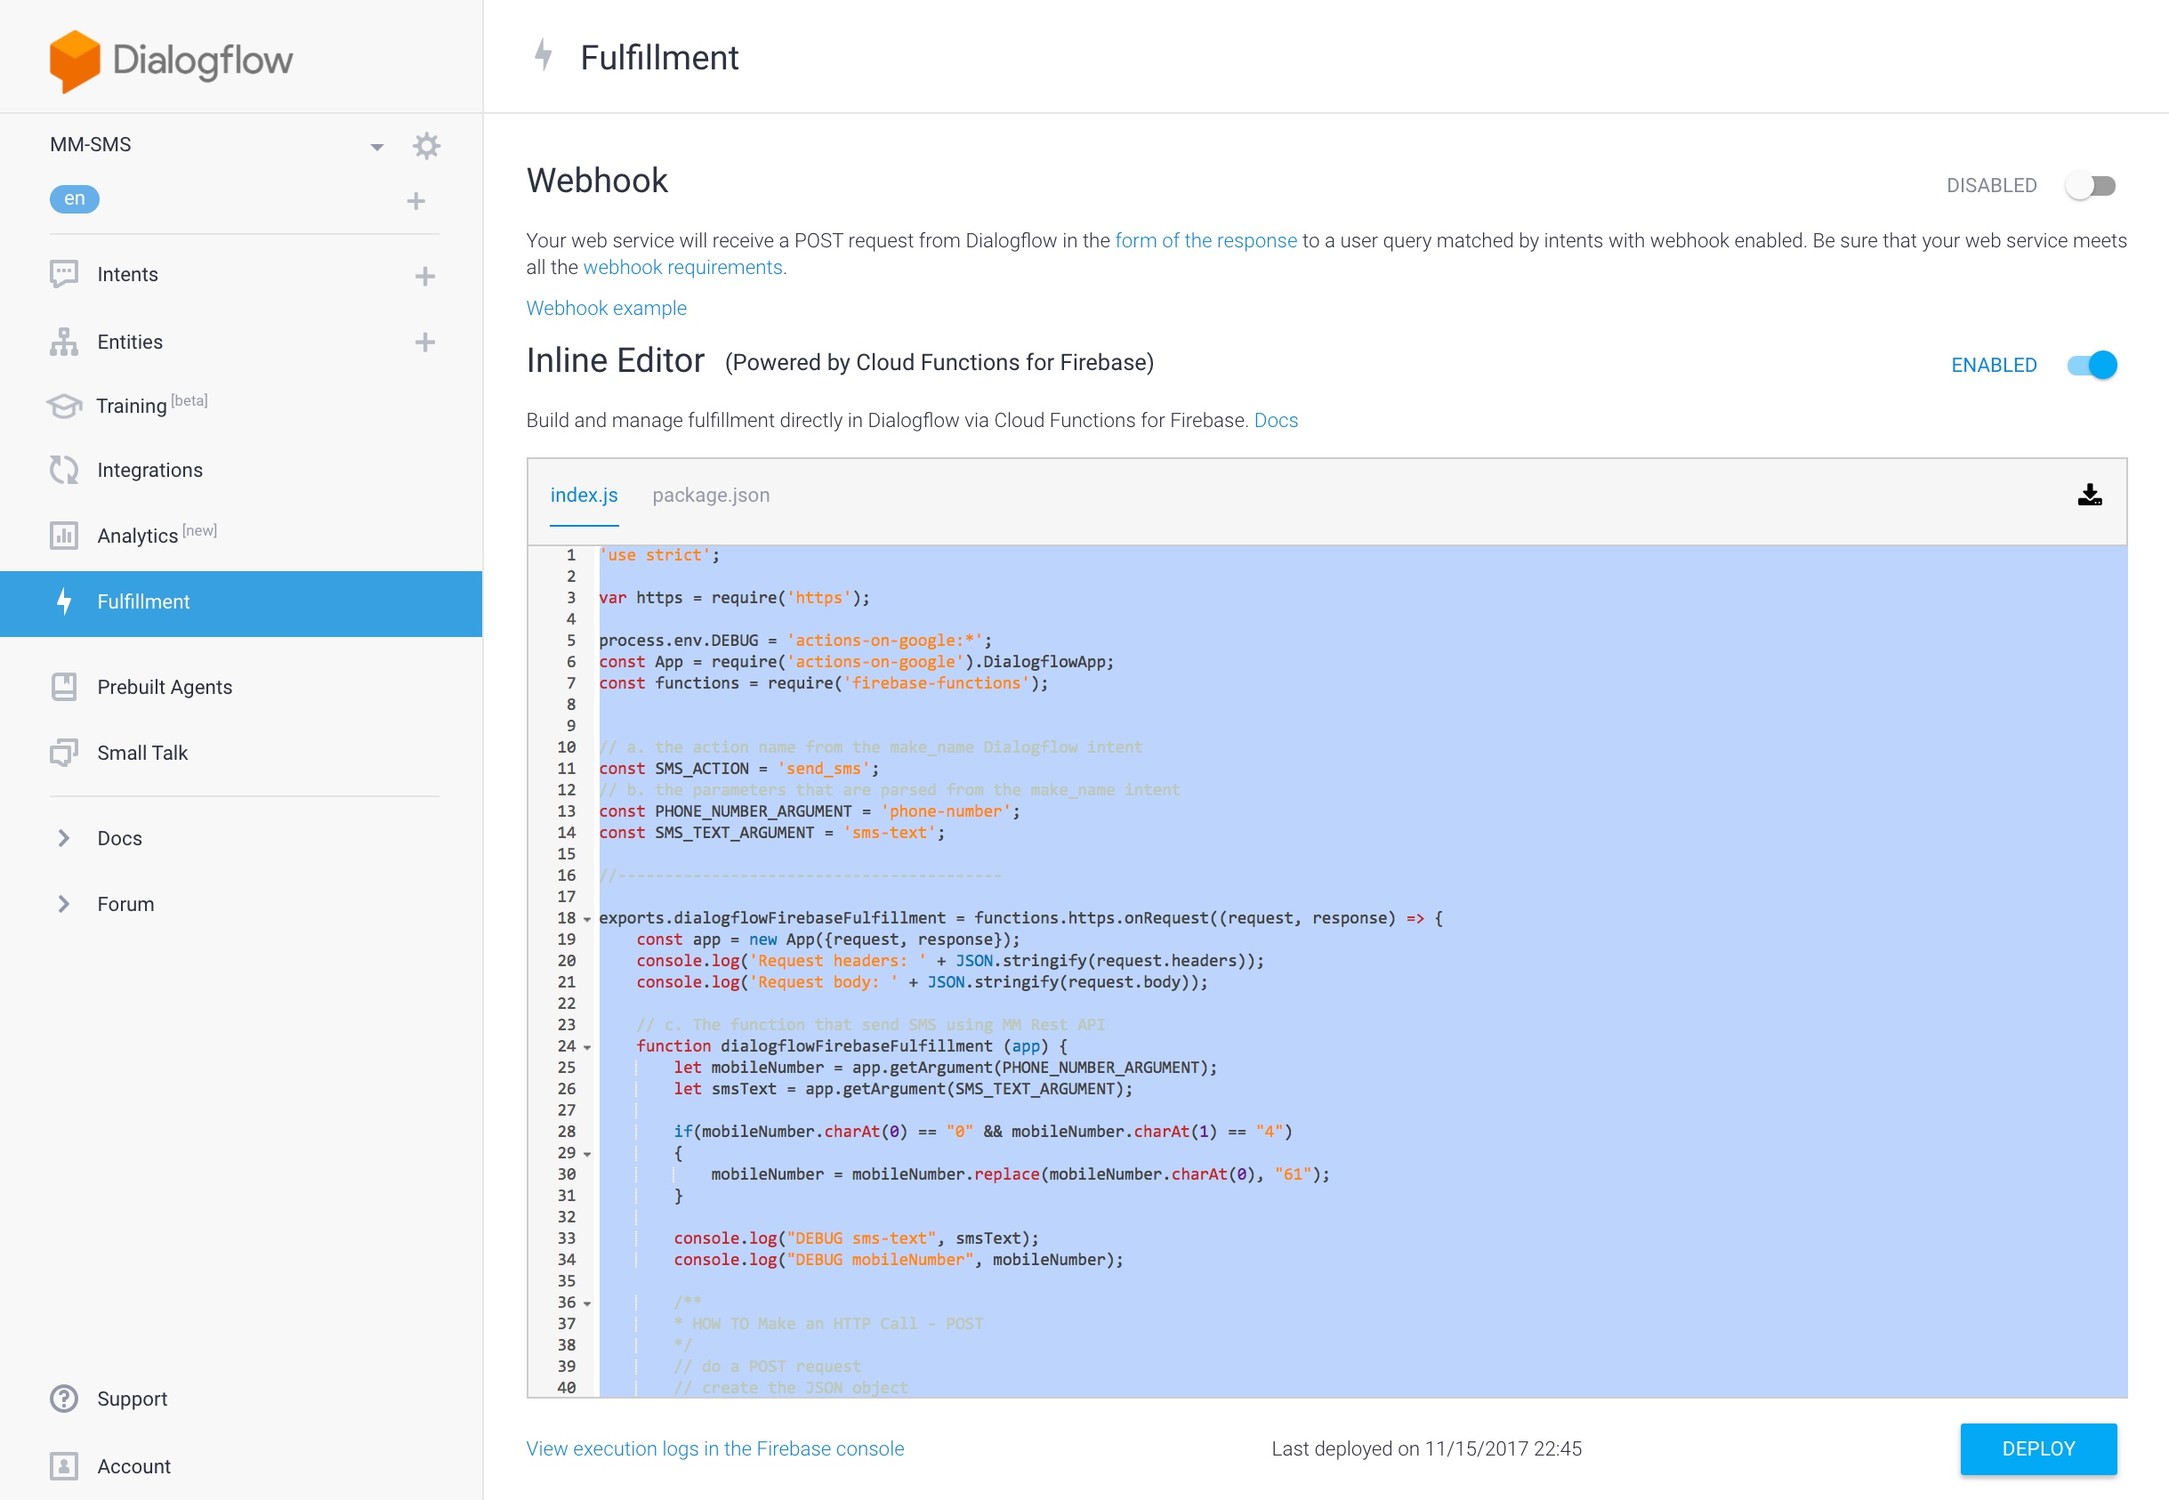
STEP 3: Create a Fulfillment
Click on “Fulfilment” and enable the Inline Editor as the function is quite simple. Now paste in the content from the index.js in the following GitHub link – https://github.com/gdd1984/MMGoogleAction/blob/master/index.js. Make sure to use the encoded value in STEP 1 and replace the text that says “REPLACE-WITH-BASE64-ENCODED-USERNAME-PASSWORD” and click “Deploy”.
Nodejs Code:
'use strict';
var https = require('https');

process.env.DEBUG = 'actions-on-google:*';
const App = require('actions-on-google').DialogflowApp;
const functions = require('firebase-functions');


// a. the action name from the make_name Dialogflow intent
const SMS_ACTION = 'send_sms';
// b. the parameters that are parsed from the make_name intent
const PHONE_NUMBER_ARGUMENT = 'phone-number';
const SMS_TEXT_ARGUMENT = 'sms-text';

//-----------------------------------------

exports.dialogflowFirebaseFulfillment = functions.https.onRequest((request, response) => {
    const app = new App({request, response});
    console.log('Request headers: ' + JSON.stringify(request.headers));
    console.log('Request body: ' + JSON.stringify(request.body));

    // c. The function that send SMS using MM Rest API
    function dialogflowFirebaseFulfillment (app) {
        let mobileNumber = app.getArgument(PHONE_NUMBER_ARGUMENT);
        let smsText = app.getArgument(SMS_TEXT_ARGUMENT);

        if(mobileNumber.charAt(0) == "0" && mobileNumber.charAt(1) == "4")
        {
            mobileNumber = mobileNumber.replace(mobileNumber.charAt(0), "61");
        }

        console.log("DEBUG sms-text", smsText);
        console.log("DEBUG mobileNumber", mobileNumber);

        /**
        * HOW TO Make an HTTP Call - POST
        */
        // do a POST request

        // create the JSON object
        var jsonObject = JSON.stringify({
            "messages" : [
                {
                    "content": smsText,
                    "destination_number": "+" + mobileNumber,
                    "format": "SMS"
                }
            ]
        });

        console.log("DEBUG request: ", jsonObject);

        // prepare the header
        var postheaders = {
            'Content-Type' : 'application/json',
            'Authorization' : 'Basic REPLACE-WITH-BASE64-ENCODED-USERNAME-PASSWORD'
        };

        // the post options
        var optionspost = {
            host : 'api.messagemedia.com',
            port : 443,
            path : '/v1/messages',
            method : 'POST',
            headers : postheaders
        };

        console.info('Options prepared:');
        console.info(optionspost);
        console.info('Do the POST call');

        // do the POST call
        var reqPost = https.request(optionspost, function(res) {
            console.log("statusCode: ", res.statusCode);
            // uncomment it for header details
            // console.log("headers: ", res.headers);

            res.on('data', function(d) {
                console.info('POST result:\n');
                console.info(d);
                console.info('\n\nPOST completed');
            });
        });

        // write the json data
        reqPost.write(jsonObject);
        reqPost.end();
        reqPost.on('error', function(e) {
            console.error(e);
        });
        //-----------------------------------------

        var mobileSplit = mobileNumber.split("");
        app.tell('Have sent the SMS to ' + mobileSplit + '! For more info on please go to messagemedia.com.au .');

    }
    // d. build an action map, which maps intent names to functions
    let actionMap = new Map();
    actionMap.set(SMS_ACTION, dialogflowFirebaseFulfillment);


    app.handleRequest(actionMap);
});
You should end up with something like the following:

The code at a high level just takes the phone number and SMS content from a JSON object that gets passed into the Fulfillment function. Then it uses the MessageMedia REST API to do a https post to actually send the SMS. Note, the country code is mandatory.
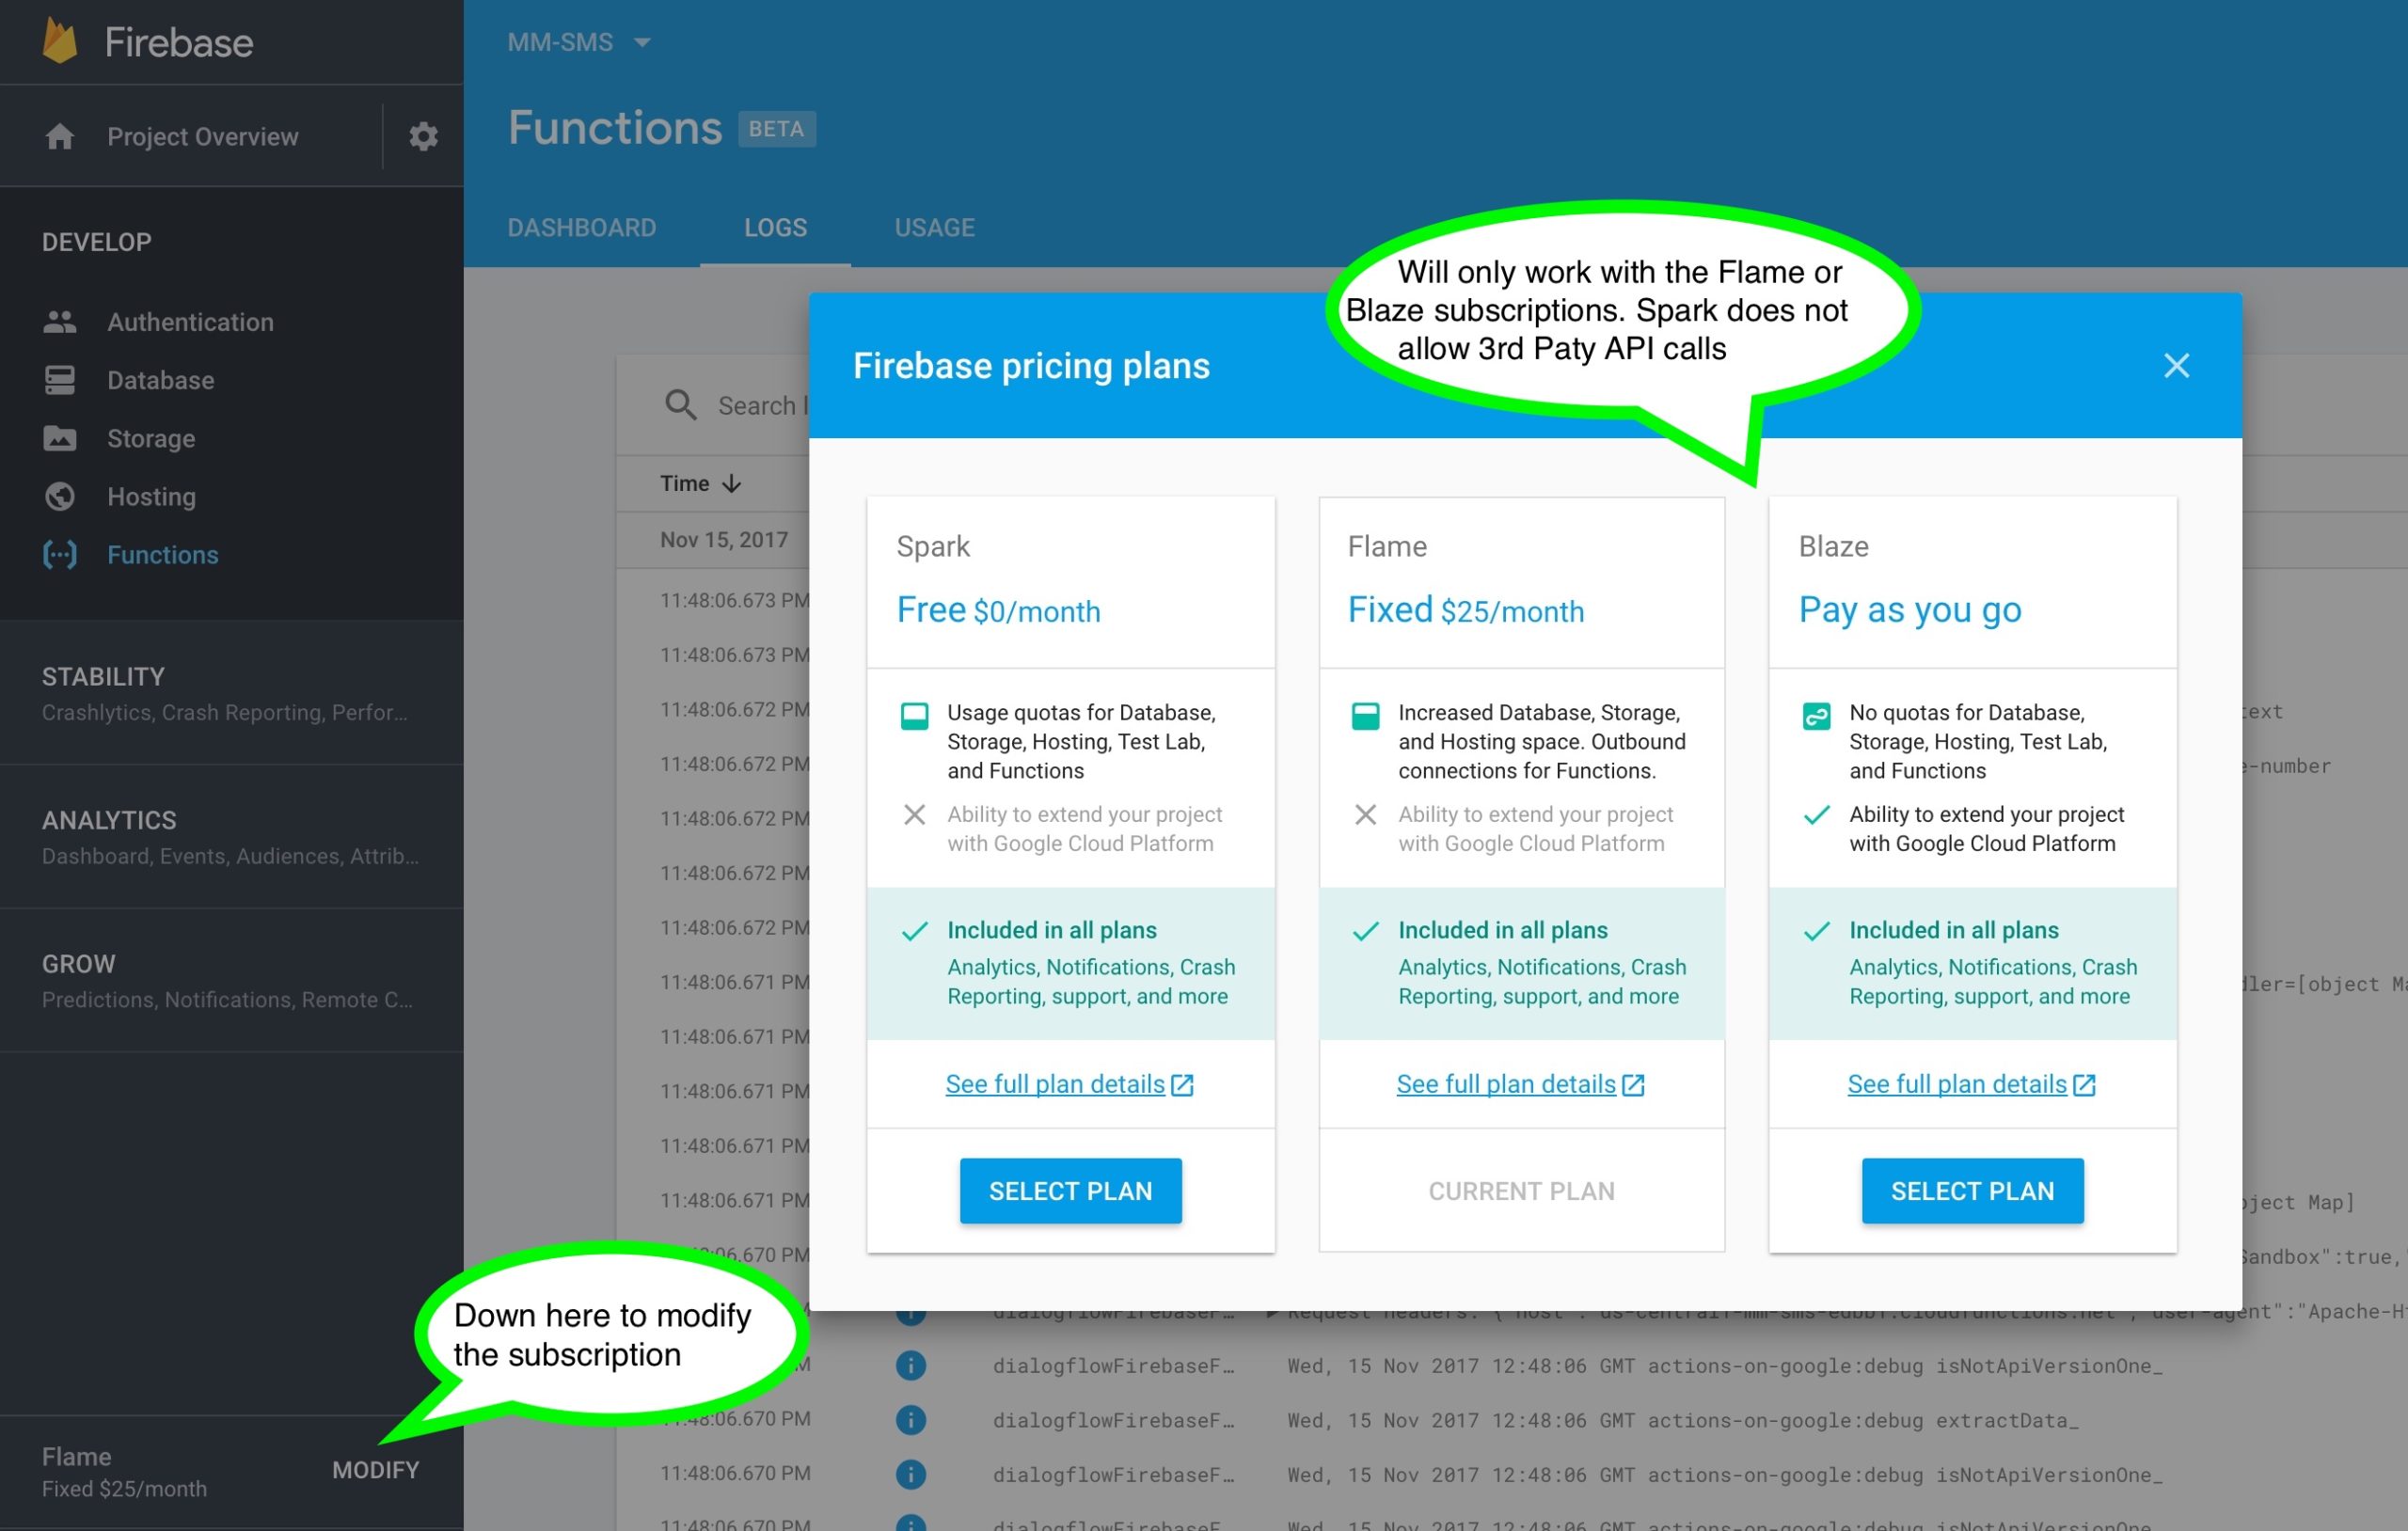
STEP 4: Pay for Firebase
Sorry all, this is where Google Actions start taking your money for accessing 3rd party API’s. Unfortunately, if you do not pay you will not be able to send the HTTP POST request to MessageMedia.
Word of note, if you do not pay and follow on with the next steps the application will still work to the point where it tries to send the HTTP POST request but then fails with a timeout. It never really says that you need to pay and the location you have to pay is a bit tricky at first to navigate to.
If you are in the Fulfillment screen click on the little bottom link that says “View execution logs in the Firebase console” and then it will open the Firebase console. On the bottom left you will see where you can upgrade the subscription. Make sure you select either the Flame or Blaze subscriptions.
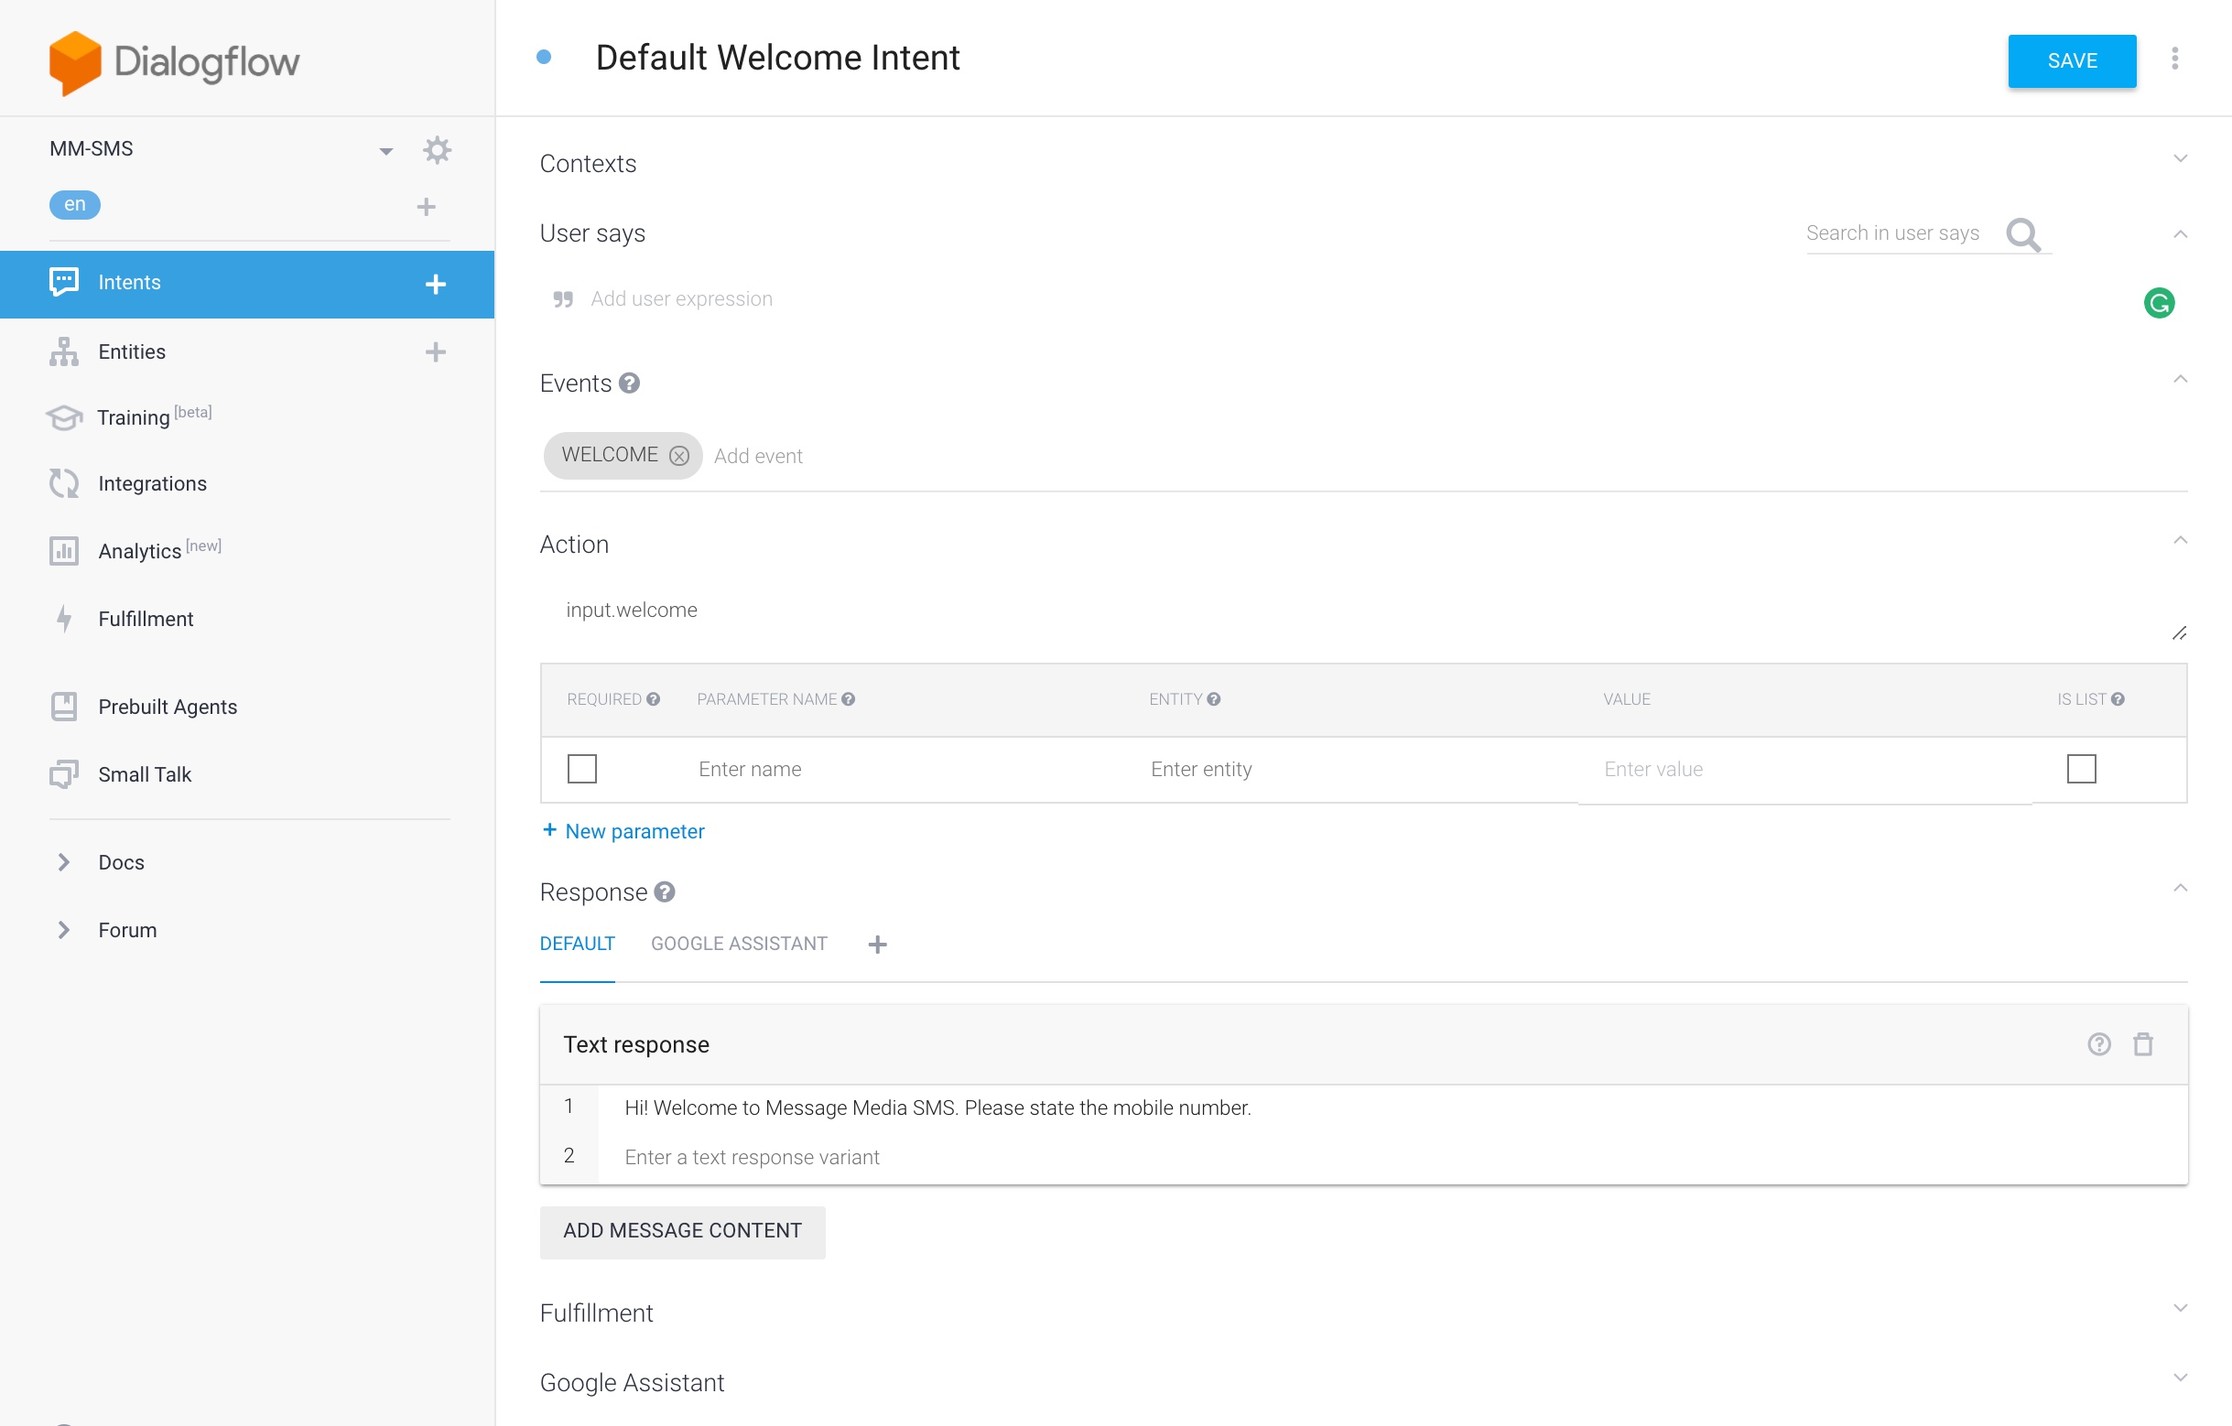
STEP 5: Edit the Default Welcome Intent
Intent defines an interaction with the user. Every action has a default intent.
Navigate to “Intents in the Dialogflow” console. Click on “Default Welcome Intent”. Delete all the default responses and fill in an appropriate default text response that the user will hear after the first time the user first asks the app to open. Then click “Save”.
You should end up with similar to the below:

STEP 6: Create the send_sms Intent
This is the Intent with the bulk of the interaction with the user. Click Intents and “Create Intent”.
There is a lot of detail to fill in on this page. The below image should assist you with filling in the details. The following sections are worth noting:
The “User says” section is where you can fill in a few different ways of how you think the user will interact with the question posed in the Default Welcome Intent. The more differences you add in there, the more accurate the NLU gets. Make sure you are selecting “@sys.number-sequence” as the entity as the user will be trying to voice out a phone number. Just a word of caution, other entities have trouble picking up long numbers like this.
The last action is to retrieve the SMS content. Make sure the entity here is “@sys.any” as this will allow for all the content to be sent to the webhook for delivery. Also, both default prompts should be filled in, as these will be used if the content is not recognised to repeat the question.
Next fill in the Actions section with default prompts and make sure you check the Fulfillment, “use webhooks” and the Google Assistant “end conversation” checkboxes. Make sure to save the intent.
STEP 7: Test the Action
Now it starts getting fun. Navigate to Integrations >> Google Assistant >> Select send_sms in the Additional triggering intents section >> click TEST and then the subsequent VIEW button that appears.
Testing of the app can now occur. You can either type in the interactions or use your computer’s microphone.
STEP 8: Test on Device (optional but most rewarding!)
As long as you have completed all your Google Actions development in the same account as you used to set up your Google device, you can now test. In my case, I was using a Google Home Mini and all I had to say was “Ok Google talk to test app” and off I went.
————————————–
Quick thanks to Nicholas Dragon for helping me with this project. Hope this helps to demonstrate how easy it is to use the MessageMedia SMS API and to get your very own Google Action working. Happy tinkering.