Share article:
An Introduction to AWS Step Functions

This is a guest blog from Lini Abraham, an Automation Test Analyst at MessageMedia.
Lini is working as a QA Engineer in MessageMedia.She is curious to learn and experiment new technologies. Working in a highly ambitious and flexible team has enabled her to work on development tasks along with testing. She also loves travelling and exploring new places with her family.
AWS Step functions are one among the current 90 and ever-growing services offerings by Amazon Web Services. It’s much the same as a state machine where a system has multiple states and the output of the previous state serves as the input for the next state. This article is will give you a basic idea to build a simple step function on the AWS Console.
In your applications, there might be scenarios where there are ‘n’ number of states or steps and for a process or job to be completed, it has to traverse through these states. Step functions lets you build visual workflows to coordinate different activities in your applications. The implementation of each step can be accomplished using AWS Lambda which is a server-less computing platform provided by AWS. Building server-less applications means that you can focus on your code instead of worrying about managing and operating servers or runtimes as it’s taken care of by the cloud provider. It’s a pay-as-you-go model where you only pay for the duration and memory allocated to run your code; without any associated fees for idle time.
Step functions are defined in JSON format using AWS States Language (ASL) (AWS Documentation: https://states-language.net/spec.html). The state machine can be validated and visualised as a workflow (similar to a flowchart) on AWS Console by providing the JSON definition.
The best way to learn something is through practice. So, let’s create a simple step function with only one state.
AWS Documentation to create a state machine can be found here.
Pre-requisites for creating the state machine
You’ll need an AWS account and access to your AWS console.
Step 1: Create the IAM Role which lets Lambda function write logs to Cloud Watch
Navigate to AWS IAM > Create Role > AWS Service > Choose Lambda > ”Next: Permissions” > filter and select the policy “CloudWatchLogsFullAccess” > ” Next: Tags” > ”Next: Review” > Provide the role name as “lambda_cloudwatch_access“ > Create Role.
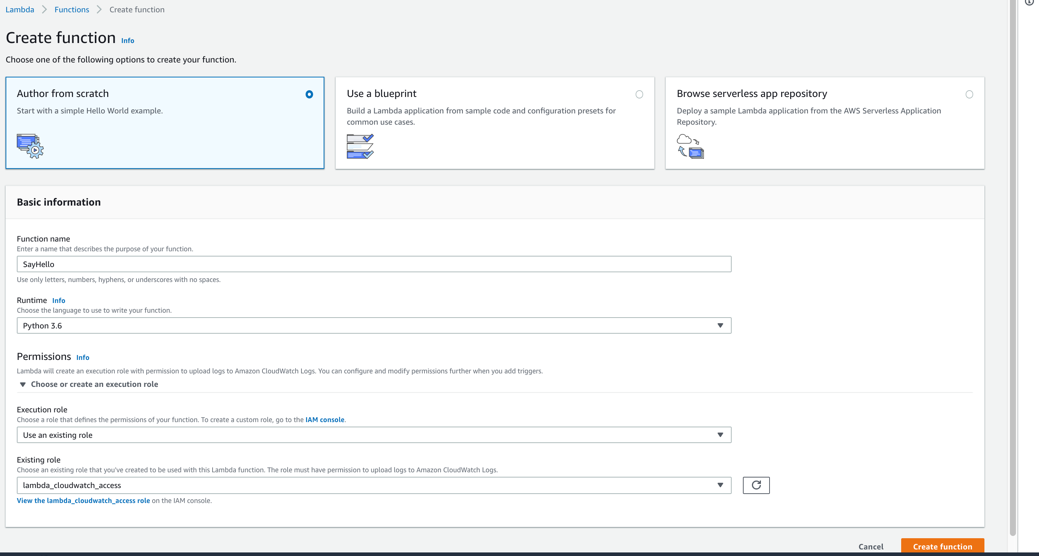
Step 2: Create a Lambda Function from AWS Console using Python 3.6 runtime
(For more information regarding creating a Lambda on AWS console, refer to the AWS documentation here.)
On AWS Management Console, navigate to “Lambda” service > Create Function > Choose “Author from scratch” > Provide the function name as SayHello with runtime as Python 3.6 > Click on Choose or create an execution role under “Permissions” and select “Choose an existing role” from the drop-down and provide the role name lambda_cloudwatch_access > Click on Create function button.
Copy the below code and paste it in Lambda code section. The below function will get the name field from its input event and returns ‘Hello ‘ + as the output.
def lambda_handler (event, context):
name = event['name']
return 'Hello ' + name
Click on “Save” button at the top of the console and note the ARN of the lambda which will be used inside the Step Function definition. The ARN looks like this:
arn:aws:lambda:<aws_region>:<aws_account_id>:function:SayHello
Step 3: Create the IAM role to grant access to Step Function to execute Lambda Function
The step function that we create later in this tutorial requires permission to execute the “SayHello” lambda function.
On AWS Console select IAM > Create Role > AWS Service > Choose Step Function > Click on “Next: Permissions” button >
“AWSLambdaFullAccess” permission is displayed by default > Next: Tags > Next: Review > Provide the role name as “stepfunction_lambda_access > Click on Create Role
Once you have created the role, note the role ARN to use it while creating the step function.
Step 4: Create an AWS Step Function (State Machine)
In the AWS documentation, the state machine is created by selecting Templates which lets you build it from existing templates. In order to create a step function from scratch, choose Author with code snippets instead (Refer to the below screenshot), name it as ‘SayHello’ and paste the state machine definition.
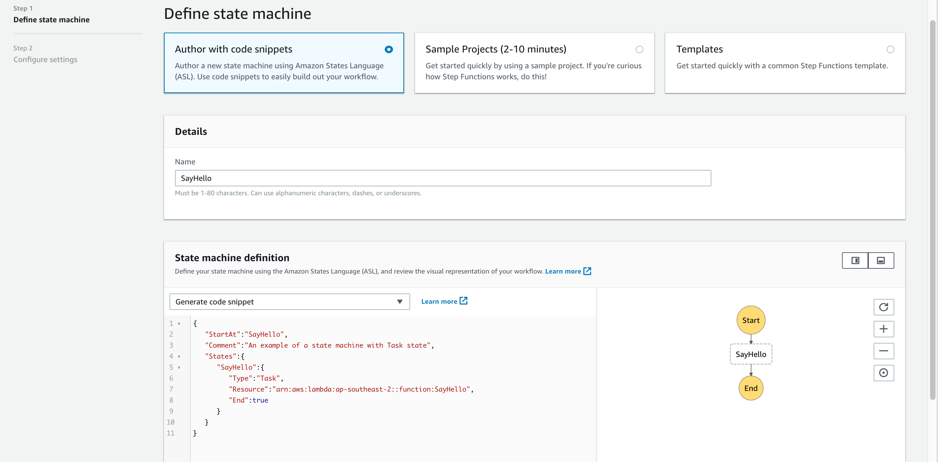
In this example, we will use the below definition written using Amazon States Language.
Note: Replace the value of “Resource” key with the ARN of SayHello lambda function created earlier
{
"StartAt":"SayHello",
"Comment":"An example of a state machine with Task state",
"States":{
"SayHello":{
"Type":"Task",
"Resource":"",
"End":true
}
}
}
After pasting the definition, click “Next” and “Choose an existing IAM role” and provide the ARN of the role we created to grant lambda execution access to Step Function. Then click on Create state machine button.
Step Function mandatory and optional fields
Mandatory fields: startAt, States
Mandatory fields of a state with Type =” Task”: Resource, End/Next
Optional: Comment
Let’s take a deep-dive into the JSON definition:
StartAt: The name of the state from which you expect the workflow to begin with
States Object: All the different states in the step function and their attributes go in here
SayHello: Name of the state
Type: AWS supports 7 types of states
- Task – Performs a specific action
- Choice – Lets you add and evaluate conditions
- Parallel – Carries out actions in parallel
- Wait – Adds delay for a certain amount of time specified
- Fail – Terminates a step function execution resulting in a failure
- Succeed- Ends an execution successfully
- Pass – Passes the input of the state and extra parameters to its output
Resource: The Amazon Resource Name (ARN) of your Lambda function
End: Any state except for Choice, Succeed, and Fail must have a field named “End” whose value is a Boolean if that is the final state of the step function
If there is more than one state, then the states must have either “next”: “name of the next state” if it’s followed by another state or “end”: true if it’s the last state (except for Choice, Succeed, and Fail states).
Step 5: Running your Step Function
To execute your step function, navigate to Step functions on AWS console and choose the step function you created.
In the “Executions” tab, click on Start execution button, specify an execution name and provide the input as below
{
"name": "Input your name here"
}
Once you hit start execution button, you will be able to see your state machine getting executed and the colour of the state changes to green if it succeeds (blue while it’s being executed).
Click on the state to see it’s input and output and exception if the state execution fails in which case, the state is represented in red colour. The input and output for the sayHello state is as follows:
input: {
"name": "the name you entered"
}
output: "Hello "the name you entered"
Conclusion
So now you have learned to create a Step function. You understand the lambda function which runs the implementation code behind the “task” state of the step function, IAM roles for the Step function to execute the lambda function and lambda to output logs to Cloud watch.
In real-time scenarios where you have complex interrelated states which perform single or parallel actions and evaluates decisions, you can orchestrate them programmatically using step functions and serverless technologies in an efficient manner. There will be many advancements and expansions in step functions and the serverless world in the forthcoming years and it will be exciting to see the evolution.